Friday, 26 December 2014

Increase your android phone internal memory without link2sd pro.

Yeah…… it’s me again.
Today,I am going to tell you a secret about having a very
large internal memory free space. You hate seeing that
message “your device is running low on memory” ,I hate it
too,and developers aren’t helping matters.
You have to pay to free up your internal memory,can you
imagine?
There is an application on Google play called link2sd, it does
the magic of freeing up your internal memory So that you
can install more applications and update too.
But there is a problem. You can’t move application data
unless you buy the pro version.
What i am about to tell you is bad business for the
developers.
What you need:
1)A partitioned sd card(search, how to partition your sd
card)
2)Link2sd latest version. (download from Google play or
anywhere good)
3)smanager (download from Google play or anywhere good)
After partitioning your sd card,Which would format it
also,install link2sd and select the appropriate option,I
selected ext4 because I used cwm to partition my sd card.
Please make sure you select the right option,if you used a
pc to partition your sd card select ext2 in the link2sd
application, after everything is set,you would have to reboot
your phone and open link2sd, if no message shows up,that
means you did it correctly.
Now select all the applications on your phone in the top
menu of link2sd and link everything(application files,dalvik
cache files,library files ) except the data(you have to pay
for that). Wait for the process to complete,then check your
internal memory space. It would have increased drastically.
To the main discussion. I will teach you how to link
application data(Which you have to pay for on link2sd ) free
of charge.
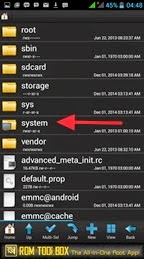
Open the smanager application, grant it super user,it’s a
file explorer that can access the root of your phone. Now
using the smanager, go to the root of your phone as shown
below.
You see that upward facing arrow at the top left menu,that
is what you press to go deep into your phone,until you get to
the root “/” as shown above.
Now click on “data” ,scroll down and click on “data” again
(/data/data) ,now that is where all your application data
are stored.
Note: it’s not everything there that is safe to link to sd
card.
Linking in android is replacing the original files with a
“shortcut” that links to where the original files are (in the
sd card)
Please do not link any folder named com.android.anything
they are system application data that your android os use,
Also do not link any folder named com.gionee.anything or
com.phone_model.anything it’s the stock applications data
that comes with your phone.
Do not link any folder named com.mediatek.anything or
com.processor_name.anything there are the applications
data your processor make use of.
Lastly don’t link any folder you don’t know Which application
make use of it. Just make sure it’s not a system application
that uses it,cause it might cause the application to
misbehave. So be cautious.
Now select all the folder there except the ones you shouldnt
link written above,now select move,then go back to /data
and scroll down,select “sdext2″(/data/sdext2 ) and then
click on the data folder there (/data/sdext2/data) now
click on “select this directory” to move them into the folder
named data. After successfully moving them, select
everything you just moved, and click on “link”,go back to
the first data folder (/data) and click on data again(/data/
data) then select this directory. This would transfer the
links to where the original files were before you moved
them to sdext2.
Sdext2 is a memory space of your sdcard mounted into your
internal memory, So that your phone sees it as part of your
internal memory and not as sdcard space anymore. Go check
the link2sd application, you would see that the data files
have been linked even though you haven’t purchased the
pro. And you would have more space on your internal
memory.
Bonus tips: Common…… with all these tricks and tips, don’t I
deserve a follow or subscribe from you? Just click on the
subscribe button after entering your email to receive more
tips and tricks. Thanks.
Those that don’t want to partition their sdcard, but in case
you have already partitioned it,no problem,still do this:
Now finally,to boost your internal memory to up to 1Gb ,Yes
you heard me right,it’s So annoying when you have to install
a super game and you have just 150mb arrggghhh. Now go
to the data (/data) scroll down to where you see a folder
with name “log”,mine is named log_other_mode ,yours
might be different,it’s the folder where the data logs are
stored, now select all the log files in it (/data/
log_other_mode) and select move. Move to any empty folder
in your sdcard, then select all and link them back to the log
folder (/data/log….)
Now check your internal memory,you should have at least
900mb free or more depending on how large the log files
were. Currently I have 845mb free internal memory and 159
applications installed.
I can install 30 more applications and link all of it,without
running out of memory.
See yaa.
Don’t forget to subscribe to my blog or follow me. Thanks.

Wednesday, 24 December 2014

10 important Android Utility Apps for Rooted phone

Here's my top 10
Es file manager
HIfont
Titanium backup pro
Adownloader
ADM pro
ROM toolbox pro
Lucky patcher
Freedom
Xposed installer
Google keep

For Those Having Problem With Etisalat Payg Plan

I know you all know about the etisalat PayG plan, and its really
good for heavy download user, but some of us are having
problem with it. So am going to show u guys how to use it
flawlessly.
1. Get two etisalat sim card.
2. Register/subscribe one or both of them to the PayG plan.
3. Recharge any amount u want on one of the sim.
4. Now transfer 30naira to the other sim u want to use in
browsing and downloading. (30naira nothing less nothing
more.)
5. Now connect to the internet and start browsing and
downloading.
6. Time yourself and surf the net for 50minutes.
7. Pause all downloads if you know they will restart again and
disconnect from the net.
8. Now check your remaining balance and u will see 15naira
remaining (if u did not see any money left then go check your
village if witches or wizards dey disturb u).
9. Now transfer 15naira to the sim to make it 30naira again
and connect to the net and continue whatever u are doing.
Just follow the steps u can use 100naira for up to 3hours.
HOW TO TRANSFER
Dial *223*0000*Amount u want to transfer*number u are
transfering to#
example: *223*0000*30*09090-------#
NOTE:
1. Always browse for 50minunte before u disconnect, because
if u exceed it to an hour they might zap all your money.
2.Always check your account balance and make sure its
30naira before u connect.
3. On no account u browse with a large money on your sim
because they will zap it all.
IF U DONT UNDERSTAND JUST ASK YOUR QUESTION.
GOODLUCK.

How To Install Two Whatsapp In One Android Device [root NOT Required]

This tutorial will show you how you can install two different
Whatsapp application in your android device. Note this method
doesn’t require root access, so it will work on any android either
rooted or not.
The trick makes use of a modded version of WhatsApp for Android
which is called OGWhatsapp which has all the feature of the
original whatsapp and even other cool features.
How to Install OGWhatsApp on Android Device to Enjoy
Two WhatsApp
1. First you have to do a full backup of your present WhatsApp
by going to chat setting and click on backup conversation. [see
image below]
2. Now go to Settings>> Apps then click on your current installed
WhatsaApp and click clear data. [see image below]
3.Now to the most important step, you should use any available
file manager then goto sdcard/WhatsApp which is the folder of
your currently installed WhatsApp and rename the folder to
OGWhatsApp so the path will now look like sdcard/OGWhatsApp.
[see image below]
4. Now download the latest version of OGWhatsapp from here
OGWhatsApp v2.11.315.apk and install it.
5.Now you should have two WhatsApp installed on your device but
the last step is also very important, you should open the
OGWhatsApp and when it asked for number to verify, use the old
number you were using with the official whatsapp on your device
before and it should verify without any code been asked, now
open the official WhatsApp and it will also ask for a number now
type in the new number you want and get the code on that
number and verify.

Tuesday, 16 December 2014

MTN is giving out free 6000 bonus minutes to the
lucky people for call one or two best friends.
To check if your MTN SIM is part of the luck SIM
that received the promo. Just Dial *559*10#
You can only use this 6000 bonus minutes to call
your partner which is your best friend forever.
You Need to Add Your Partner Number Before You
Can Be Able to Use This Bonus
To add a partner dial *560*1*Number# E.g
*560*1*08033445566#
If you are on True Talk or Smooth Talk package,
you may dial *380*1*Phone Number# to add
your partner.
And if you are on iPulse package, dial
*390*1*Phone Number# to register your
best friend forever.
To delete registered number on True talk and
Smooth talk, dial *380*2#
To delete registered number on iPulse, dial
*390*2#
Note: You can only add one best friend for Smooth
Talk Package and Two best friends for True Talk
package.
As I said earlier the Bonus is for the luck SIMs not
for all SIM, if you dial *559*10# and you met it
there, that is your own luck, keep rock and enjoy
it with your beloved one and if not, just cool down
& stay glued to chobatech.blogspot.com , you might be the one
that the next update will favor.

Sunday, 14 December 2014

Rom Toolbox Pro 6.0.6.1 A Must Have App For all

Rom Toolbox Pro
ROM Toolbox is THE MUST HAVE APP for every root
user.ROM Toolbox combines all the great root apps into
one monster app with a beautiful and easy to use interface.
ROM Toolbox has every tool you need to make your
Android device fast and customized to your liking. Save
85% by getting ROM Toolbox instead of spending $30 or
more on other apps.
This app requires root permission.
ROM Toolbox combines apps like Titanium Backup, ROM
Manager, Root Explorer, SetCPU, MetaMorph, Autorun
Manager, Terminal Emulator, Script Manager, SD Booster,
BuildProp Editor, Font Installer, Boot Animation Installer
& many more apps into an all-in-one app! Here is a list of
some of the features you will find:
ROM Management
☆ Install ROMs & themes from a growing list of ROMs.
AOKP, CyanogenMod and other popular ROMs included.
☆ Create, manage & restore nandroid backups
☆ Wipe data, cache, dalvik-cache, battery stats
☆ Install multiple ROMs & ZIPs from your SD card
App Manager
☆ Batch backup & restore apps and their data
☆ Schedule backups to run at a certain time
☆ Restore apps from nandroid backups
☆ Backup/Restore text messages, bookmarks, accounts,
etc.
☆ Backup your apps to dropbox
☆ Freeze/Defrost system & user apps
☆ Backup/restore Android Market link
☆ Task manager
Root Explorer
☆ Access the whole of android’s file system (including the
elusive data folder!).
☆ Batch copy/paste, zip, tar, delete, move any file or
folder
☆ Change file permissions and ownership
☆ View, edit & share files
☆ File manager with two panels for easier management
Scripter & Terminal Emulator
☆ Create and run scripts as root
☆ Set your scripts to run at-boot
Auto Start Manager
☆ Enable/disable apps that run on start-up
☆ Enable/disable any broadcast receiver, activity or
service
Rebooter
☆ Reboot recovery, powerdown, bootloader, etc.
Font Installer
☆ Install custom fonts from a huge list or from your
sdcard
☆ Set fonts as favorites & send them to friends
Boot Animation Installer
☆ Install custom boot animations from a huge collection
or from your sdcard
☆ Preview boot animations
☆ Create a boot animation from a GIF file
☆ Have a new random boot animation each time you
boot-up!
Theme Manager & Statusbar Icon Changer
☆ Create and install full themes
☆ Customize your status bar by installing custom icons for
wifi, signal, gps, etc.
☆ Change your battery icons in the status bar to a custom
one from a list of 200+
Boot Logo Changer
☆ Change your boot logo for supported phone and lot more give it a try and tell us your review
Download and enjoy

How to Check if Your Tecno Battery and phone are Original

Most tecno lover goes to the market to get a tecno
smartphone only to get a fake battery. so i have decided to
teach you guys how to check if your battery is original.
How to Check if Your Tecno.phone Battery is Original
Visit http://gc.tecno-mobile.com/
Type in the IMEI of your Tecno phone in the IMEI form
Type in the “VC” of your Tecno phone in the
“VC” form click submit apply the same to the “SN” [Serial
Number] form click submit After that, you will know if
your Tecno Smartphone is original.
I will advice you when going to a market store go with an
internet enabled phone.

Saturday, 13 December 2014

5 Must Have Apps For Rooted Android Devices

Android is one of the most popular mobile operating
system and it’s no doubt very amazing. To get the very best
out of your android device, you root it; and by reading this
post i assume you already have. If not, i recommend you
read “How to root your Android device ”, it’s a brief guide
to get you through it easily.
Once your android device is rooted, you’ll have control over
system files, boot setting and more, you also get to run
various powerful apps that won’t work perfectly on un-
rooted devices. A lot of rooted android device users still
doesn’t realize the full benefits of rooting and the cool apps
they can enjoy, if you happen to fall within that category,
this post is totally meant for you.
I’ve put together the 5 must have apps for rooted android
devices and i’m certain you’ll love them. Let’s get to know
them.
System App Remover
There are apps deemed unnecessary in your device, mostly
built-in apps and all they do is fill up your storage space.
With system app remover you can remove any app from
your android device. It also provides you the option to
uninstall an app or move it to SD card/phone memory. You
can as well install, scan, search and manage APK files via
the APK manager.
Root Explorer
Also known as the ultimate file manager for rooted android
devices, root explorer gives you access to the entire file
system of your android smartphone or tablet. It’s actually
one of the first app to install once you’ve rooted your
device, you can easily uninstall unnecessary apps and
manage your system file in general.
Greenify
The work of Greenify is to save your battery, ensure it last
longer and aid your android device run smoothly. To do
this, it identifies and hibernates misbehaving or battery
consuming apps when you are not using them; to stop them
from slowing down your device or consuming the battery
unnecessarily.
AFWall+
The AFWall+ (Android Firewall +) is a front-end
application for the powerful iptables Linux firewall. With
this application you can restrict which apps are permitted
to access your data connection, be it 2G/3G/4G or WiFi.
You can as well control traffic within LAN or while
connected through VPN.
SuperSU
The SuperSU is a must have app for all rooted android
devices. Rooting has its pros as well as cons, and one of the
major disadvantages is the possibility of malicious apps
gaining administrative level access to your device. That’s
where SuperSU comes into play, it acts as the permission
giver; each time an app tries to get root access.

Simple Way to create CWM BACKUP for your MTK Android

Download recovery tools from playstore then download the recovery IMG for your phone from Google ,open the recovery tools Okay, click on i knw the risk then click on flash other recovery and locate the recovery IMG in your folder and flashing begins, then your phone will automatically enter cwm mode, then use your volume up and down button to scroll and power button to select, you will scroll to back up and restore and click on back up,then wait to complete, then click on reboot, that's all.

S5 ROM TECNO M3 BY CHOBATECH

For people begging me to relase d rom have finnaly release it ooo at ayo,dammmy, and victor
NOTE
*.MAKE A BACKUP OF YOUR PHONE BEFORE DOING
ANYTHING
*.This is self tested by me and is not a cramp or bug or
anything else
*.Do this at your own risk!!!
*.If anything goes wrong dont blame me
Features of Samsung Galaxy S5 CustomRom:
Android 4.4.2 Kitkatie
S5 Widgets
S5 Weather
S5 Lockscreen
S5 My Files
S5 Camera
S5 Notifications Bar
S5 Setting
Samsung Bootanimation+Bootlogo
S5 Fonts
S5 Dailer Not working
S5 Framework
S5 Kitkat Battery Icon
Transparent Status Bar
Kitkat USB Mass Storage
S5 Stock Wallpaper
Pre- Installed Developer Apps
Pre-Rooted
After downloading the ROM boot into recovery & follow
these steps
-For CWM user
1. Wipe data/Factory Reset
2. Wipe Cache
3.Format System
4.Wipe Dalvik Cache
5. Install zip from SDCARD
For COT Recovery User:
1. Factory Reset
2.Pre Flash Wipe
3.Storage Management & Wipe Dalvik Cache
4.install zip from SDCARD
For CTR Recovery User:
1.Go to Wipe Menu and wipe all selected item
2.install form zip & card;
*After installing.
4. Reboot Phone In first startup it may take a long time
to start. Don’t worry your phone won’t brick
Part1  www.docs.google.com/file/
d/0BytqCaMW8t97aG51NVVuSks3WWM/edit?
usp=docslist_api
PART2  www.docs.google.com/file/
d/0BytqCaMW8t97RTBNZC14V2t3dzA/edit?
usp=docslist_api
PART3  www.docs.google.com/file/
d/0BytqCaMW8t97bG9jSHlYalRWVXM/edit?
usp=docslist_api
PART4 www.docs.google.com/file/
d/0BytqCaMW8t97T3RrSjI5X2dLTTA/edit?
usp=docslist_api
Download all part put in a folder and download b1
archiver Here just click. Part 1 it will extract all
Just one bug dialer not working but download Dw dialer from Google
just like stock dialer
Happy flashing

Android names

I know that the name of new Android after lollipop will
start from 'M'Let me show how
A = Alpha
B = Beta
C = Cupcake
D = Donut
E = Eclair
F = Froyo
G = Gingerbread
H = Honeycomb
I = Ice Cream Sandwich
J = Jellybean
K = Kitkat
L = Lollipop
M = ?
It will be sure that the name of new android will be on a
chocolate or candy.Because first google started giving the
names of desserts to androidBut it changed, now google
give Android the names of Candies, Chocolates,
Toffees.Please reply if anyone knows or can guess the
name of new androidOr if you like it give a reply as
'GOOD' Mine maybe milkshake

Boost your 2g and make it blaze Like 3g

Okay people, so I came across these things when surfing the internet
for increasing 3G speeds.This can benefit you of getting 3g
speeds on 2g, like me just you need to switch to 'wcdma
only' mode.
Follow ahead :
1 download this software called 3g/4g speed optimizer
from market.
2) Download this script manager
3) Download the 3G turbcharger script by zeppelinrox
NOTE: you might want to compare the speed differences
after and then of this tweak. If you, then download the NQ
mobile security app from
should give you a small network meter which shows
current network speed. download it, start it, and then
download something from the play store to see how much
speed you are getting. Its going to get increased soon
anyway
Now Follow ahead Start 3g/4g speed optimizer-choose
network speed as 12/28/7-max speed-check on down speed
increase-now click on apply tweak.!!!RESTART YOUR
DEVICE!!!Now open script manager-browse to the
downloaded 3g turbocharger text file-check on superuser
icon(N00BS: the android skeleton icon)-click on run.
script will load. wait till it asks to make a selection...-
scroll up and see what setting you need. fast, faster or
fastest. I would recommend fastest. enter the option
number.-again enter the option to reboot.thats it!After
reboot, your 3G speeds should be increased
To check your speeds, again download something from
play store, something bigger than 2-3 megabytes would be
preferable as it lets you see how far the speeds can get.
NOTE 2: this may not work for everyone, if it doesn't for
you, dont blame me, you probably are already getting the
max speed from your network operator.

Increase speaker quality of mtk smart phone

[MTK Chipset] Are you dissatisfied with the speaker volume of your phone ? Is the speaker volume of your phone is very low ? You can increase the speaker volume yourself, it is very simple.Here are steps: 1. Install Mobileuncle MTK Tool 2. Open Mobileuncle MTK Tool and select Engineer Mode 3. Select Engineer Mode MTK 4. Swap to Harware Testing 5. Select Audio 6. Select Loudspeaker Mode 7. Here you will find Max Volume Value 128, Change this to 145 and press set. 8. You can set this value up to 160 but above 150 is not recommended else it may damage your speaker. 9. Now you can close Mobileuncle MTK Tool.Now you can check the volume of your speaker and feel the difference.

How To Use Glo Bis On Android Without Changing Imei

We all know that the Glo BIS plan at N1000 for 3GB is
actually the cheapest and most affordable BIS plan in the
country, and the high-rise of Android users changing
their Imei to that of a blackberry so they can make use of
the Glo BIS plan on their Android device. The main issue
involved here is that, not all Android devices actually
allows or support change of their device Imei. The
change of Imei is quite easy if you have an MTK Device.
But for Samsung, HTC, Xperia, Lg and other brands of
Android devices practically doesn’t allow change or repair
of Imei, though it can be done through other means. But
for now there’s another way to make Glo bis work
directly on your Android device without you changing the
Imei on your device.
Kindly follow the steps below:
STEP 1: Get a Glo sim, either old or new, put the sim on
your android device, Put On your Mobile Network, (Note:
H or E will come out depending on your network mode)
Go to your Mobile Network Settings, make sure you
Network Mode is WCDMA (3G only)
Go to Access Point Names, Create a New APN called Glo
BIS or any name of your choice, Make the APN:
blackberry.net (Note: Your H will disappear)
STEP 2: Load #1000 on your Glo Sim and go to your
messages and send BBCMONTH to 777
You’ll get a message concerning the text you sent from
777 (you can dial #124*1# to confirm if they’ve removed
the money)
Go back to Settings, Then Sim Management and off the
Network, or simply put On your Airplane mode, and
remove the sim
STEP 3: Put the sim in a Blackberry phone, wait for it to
load. (After loading, mobile network, put it ON and make
sure your network mode is 2G)
Wait till you have EDGE and then try browse using
default bb browser, you may get an error message (i.e.
you won’t be able to browse)
>>Exit and Go to Option/Settings
>>Device
>>Advance settings
>>Host Routing Table
Screen_20141011_140743
Click on bb icon (bb option key) on your phone then
Register
Remove the Battery and restart then phone.
STEP 4: After rebooting the phone, go to default bb
browser and try browse for about 5 mins (browsing
Facebook or any site)
Now press the RED key and Go to Option/Settings
>>Device
>>Advance settings
>>Host Routing Table
Click on bb icon (bb option key) on your phone then
Register
Immediately Remove the Battery.
STEP 5: Put the sim in your android Device and go to
settings and ON your Sim management (off airplane mode
in case you use airplane mode)
You’ll notice H will appear. By now you’re on track.
Browsing have started again.
CAUTION: On no account must you change your APN or
off your data or your phone, if you do that you’ll have to
start from Step 3 again and it works on all devices
including mtk devices with OS 4.0 and above
Anytime your battery is low or you want to put off your
phone, simply go to settings and off your sim
management and when you want to use it, switch it on
back.
NOTE: This trick works on SAMSUNG, TECNO, GIONEE,
HTC and other devices and also on BB 10

How To Increase Battery Life On Android Device

Disable location reporting and history
GPS is a huge battery hog, as it harnesses data
from the phone's GPS chip, cell phone towers,
and Wi-Fi hotspots to find your location. The
more a phone surveys your location, the more
battery it uses. And that goes beyond just Google
Maps.
Location reporting and location history are two
GPS-based services with somewhat unclear
motives. According to a Google Help page, the
services can be used in conjunction with any
other Google Apps, and may be used to improve
your experience.
Chances are you can probably live without them,
so disable these two features by going to
Settings > Location > Google Location Reporting.
Disable Google Now cards
Now is an unmatched personal assistant, but
some of its services -- which come in the form
of informational "cards" -- are tireless battery
drains.
For example, a card titled "Nearby places" shows
you nearby attractions when you travel to a place
that Google recognizes is out of your usual
routine. Cool? Yes. Necessary? No.
To disable cards, go to Google Now, then scroll
down to the very bottom, and tap the magic
wand. Here, you can pick the cards you actually
need. As a general guide, the GPS-reliant cards
will demand the most battery, so disable cards
like "Travel time" and "Nearby places" to see a
battery boost.
Wi-Fi scanning
It's well-known that when Wi-Fi is left enabled,
more energy is used. However, on Android , even
when Wi-Fi is disabled, a phone could still be
searching for networks.
To make sure this isn't happening, head to Wi-Fi
settings > Advanced. Here, uncheck the option
for Wi-Fi scanning.
Going forward, you'll have to connect to Wi-Fi
manually, but you'll get a longer battery life in
return.
Get out of sync
When you add an e-mail account to your phone,
Google assumes you'd like to sync just about
everything. That includes Google Play purchases,
Google Keep, and even photos.
That last one is killer: photos. Each time you
snap a picture, Google uploads it to your account
to back it up. For those who use their phone as
their primary camera (that's everyone, right?),
this can seriously hurt your battery life.
There are two ways to change this. Head to
settings and find your e-mail address under
Accounts. Tap the account name again to
access sync settings, where you can un-check
the items you don't want synced. Included there
is that "Google Photos" option.
Alternatively, head to the Gallery app > Settings,
and disable Google Photos Sync.
Use the battery tool
If you're unsure how energy-demanding an app
is, or you're wondering why your battery is
draining so quickly, use the Battery tool. The
feature shows you which apps use the most
battery, with the top two items almost always
being Screen and Wi-Fi. Goto settings and click on
battery to see which apps are consuming your battery.
BONUS: search for any "Auto kill" apps on Google. Play
store to kill running app automatically.

Is Your Phone Working Slowly? Mobile Cleaner|cache Cleaner|ram Booster

https://play.google.com/store/apps/details?
id=com.worthstudio.cleaner
Is your phone working slowly?
Make your phone work faster with OnGuard Cleaner, the
absolute solution for your slow phone. Download OnGuard
and boost your RAM, save your Storage space along with
managing applications in an easier way.
1. RAM Booster:-
Boost your RAM by ending background tasks with just one
click.
2.Storage;-
Save storage space with junk cleaner feature.
3. App Manager:-

How to root Non MTK Android Jelly Bean and Kit Kat using King Root

King Root is an ideal tool to root your Android phone.
Download King Root .apk file from  Here
and install.
Run King Root application.
Click on Root button. It take sometime for the rooting
process.
A blue bar appear after finishing the process. Click on blue
button.
Restart phone.

Friday, 12 December 2014

Huawei Mate 7 Is The Phone To Get This Season....and Possibly The Next

Great readers, please checkout huawei Mate 7. I have
one at hand and you can go ahead and ask me any question
on it.
Specs;
Display
• 6-inch FHD IPS LCD display
• Resolution: Full High Definition (FHD) 1920x1080, 368PPI
• 16M colors
• Corning® Gorilla® Glass 3
Size and Weight
• 157mm(L) x 81mm(W) x 7.9mm(T)
• About 185g
SIM (Dual)
• Micro SIM
• Nano SIM
Operating System/User Interface
• Android™ 4.4 Kit Kat
• Huawei EMUI 3.0
Processor
• Huawei Kirin 925 CPU, 4 x A15 1.8 GHz quad-core and 4
x A7 1.3 GHz chipsets
• Mali T628 GPU
Battery
• 4100 mAh Li-Polymer (typical)
• 648 hours of standby time
• 8 hours movie streaming
• 9 hours of web browsing
• 3.5 hours charging time
• Super power saving mode
Memory
• RAM: 3GB
• ROM: 32GB
Camera
• 13MP (complementary metal oxide semiconductor) CMOS
rear-facing camera
o BSI sensor
o Photo: up to 4128×3096
o Video: up to 1080P 30fps
• 5MP CMOS front-facing camera
o Photo: up to 2592×1952
o Video: up to 720P 30fps
• Integrated camera flash
• Quick shooting
• Panoramic shooting
• Ultra Snapshot
• Watermark Photos
• 1080p video recording and playback
• File formats:
o Capture file format: .jpg
o Recording file format: .mp4
Sound
• DTS
• Dual-microphone noise reduction
Connectivity
• Network:
o Support for Long Term Evolution (LTE) networks and
Cat6 (downlink: up to 300 Mbit/s, uplink: up to 50 Mbit/s)
o LTE FDD: 50.0 Mbit/s (UL), 300 Mbit/s (DL)
o DC HSDPA: 5.76Mbit/s (UL), 42 Mbit/s(DL)
o EDGE Class 12: 236.8 Kbit/s (UL), 236.8 Kbit/s (DL)
o GPRS: 40 Kbit/s (UL), 60 Kbit/s (DL)
• Bluetooth 4.0
• Bluetooth Low Energy (BLE)
• WiFi 802.11 a/b/g/n (WiFi Direct, WiFi WPS)
• Portable WiFi hotspot
• Near Field Communication (NFC) support
Sensors
• Accelerometer
• Proximity sensor
• Ambient light sensor
• Compass
• G-sensor
• Gyroscope
• Hall sensor
• GPS / AGPS
Color
• Obsidian black
• Moonlight silver
• Amber gold

Wednesday, 10 December 2014

Double and Tripple Airtel Recharge codes-latest this

This double recharge offer is not really new but some people
don’t know about it, Airtel introduced a recharge promo that
does not alter your tariff plan or call cost but instead; you
can get up to X3(tripple) of your airtime recharge e.g if you
load N100, you can get N240, load N700 to get N2,100.
And what’s more, you can use these airtime credits to call
any network in Nigeria and you would still be billed based on
your tariff plan. No hidden charges or costs.
How to Convert your Credits to Get X3 of your Airtime
Balance
At this moment, Airtel puts a limit to the amount of credit
you can get and the period of days it can last before the
credit expires.
Study the list below to learn how to convert your airtime
balance to get up to X3 of your airtime credit.
How to Convert Airtel Airtime to X3
Credit Amount Converting Code Amount Converted to Days
it Expires
N100*234*100#---N240--1 Day
N150*234*150#---N350--1 Day
N250*234*250#---N650--1 Day
N700*234*700#---N2,100---3 Days
NOTE
As in the list above, once you have up to certain amount in
your credit balance, lets say N100, you can just dial the
converting code which is:*234*100#and send it, your N100
will disappear from your account and converted to N200 for
you.

Best/Cheapest MTN data subscriptions and codes for Android phones

We all love free browsing cheats and codes but in reality,we
might not always have them and at such times we rely on
"cheap subscriptions that makes things easier.
So am going to share a bunch of them.(the codes will arrive
soon. I don't have all the codes right now).
Cheapest MTN subscriptions for Android mobile
250mb = #300 (400 MTN card or VTU)
500mb = 550 (700 MTN card or VTU)
1gb = #1000 (1200 MTN card or VTU)
2gb = 1900 (2100 MTN card or VTU )
This plans Works on all Android phones and tabs, iPhones
and iPad, BlackBerry OS10, Nokia xl series, Symbian, Java
phones, Laptops and PC.
Valdity- 30 days . I personally recommend this to anyone
who wants to buy data. It will take less than 7min before
your account will be credited with data.

Latest Airtel 50MB,100MB and 200MB free browsing cheat for Nov. And Dec. -dancing Skelewu!!!!

Hey dudes,another airtel cheat has popped up from the dead
and it's Dancing skelewu on my Android right now. I mean
it's pretty fast! You can't miss this one!
Good thing you're here on Kinwap!
This cheat is in 3 different categories:
1. Free 50MB (airtel)
code: --- *141*13*50#
2. free 100MB (airtel)
code --- *141*13*100#
3. Free 200MB (airtel)
code --- *141*13*200#

Mtn free call-How to get 5x airtime on MTN via MTN airtime bonus

Mtn free call is something people have waited for for ssuch a
long time. Some people have the codes but they refuse to
share. Today,we'll discuss something that looks like Mtn free
call.
There's a new free call plan on MTN via bonus on calls
made. This is A special Offer from MTN To all Her
Subscribers that do spend At least N100 On calls everyday,
You will be awarded free N500 Worth Of free Airtime Bonus
to call All Networks when You reach Certain amount every
day depending on What MTN Programmed for Your sim
Card…
so the trick is quite simple: the more calls you make,the
more calls you can make! i.e *5 of your daily usage!
To opt-in to this package,simply Dial *507# and wait for
Confirmation message from MTN to Know Exact amount You
need to Spend daily to receive the free Bonus.. It varies a lot
and MTN has not released the metrics upon which the
required call credit to be consumed is calculated.
Tips: To Know Accumulated Spend Dial *507*1# .
Promo Valid till 15th Of December
so enjoy it while it lasts!

ETISALAT 1GB FOR #500

You can use this Etisalat 1GB for 500 Weekend Data Plan to
surf your favorites
sites during weekend starting from Friday
to Sunday,this plan expires 11.59pm on
Sunday. This is a cheap plan you can use this data
to watch videos on YouTube, chat on
Facebook, download anything you like, this
works on all devices, it work on PC, Tablet,
and mobiles be it Android, iPhone, Java,
Symbian, any other phone. How to Activate/Subscribe
Etisalat 1GB for
Just 500 Weekend Data Plan 1. Make sure you have #500 on
your SIM,
if you do not have up to 500 you need to
recharge up to 500 1. Dial *5995*2* to activate it, You
500naira will be deducted and your 1GB will
be credited on you Etisalat SIM. 3. You will receive a
message that is
successfully activated, you are good to go.. Have it in your
mind that this is Weekend
Data Plan which means it can only be used
to surf & download during weekend from
early Friday to late hour on Sunday
(11.59pm). That’s All, activate it and enjoy surfing

Monday, 8 December 2014

Welcome to Choba Tech's Blog : XPERIA TOUCH V2 FOR TECNO F5

Welcome to Choba Tech's Blog : XPERIA TOUCH V2 FOR TECNO F5

XPERIA TOUCH V2 FOR TECNO F5

Features of XPERIA TOUCH V2
Based on 4.2.2 Jellybean
100% bugless rom
PRE INSTALLED SONY APPS
Fully Sohan's special multi looks
highly moded Xperia REAR style
NO MORE BOARDNESS OF OLD XPERIA LOOKS
COLOUR CANGING WALKMAN WID CLEAR AUDIO+ &
SONY ENHENCHMENT
New Battery & Signal Icons from Xperia L
NEW STYLISH STATUSBAR ICON
DARK SILVER & BLUE Framework & SystemUI
Fully Deodexed
BRAVIA ENGINE 2 FOR BRIGHT SCREEN
Pre-Rooted wid PRIME V SUPER SU
3G Video Call Support
Super Smooth UI
Improvements in build.prop
Better Camera Quality
Sohan's battery tweaks added
More battery backup
Added Zipalign for better Ram
New Flashlight, Compass app added
init.d Supported Kernel
DSP SUPER AUDIO added
LAG FREE HD GAMING
4.2.2 gapps included
BusyBox installed
Full Gravity Box Supported
New BEAUTIFUL Boot Animation
ALL SENSOR OK
Installation System:
Make sure you do backup before flashing Rom
After downloading the ROM boot into recovery & follow
these steps-
For CWM user
1. Wipe data/Factory Reset
2. Wipe Cache
3. Format System
4. Wipe Dalvik Cache
4. Install zip from SDCARD
For COT Recovery User:
1. Factory Reset
2. Pre Flash Wipe
3. Storage Management & Wipe Dalvik Cache
4. Install zip from SDCARD
For CTR Recovery User:
1. Go to Wipe Menu and wipe all selected item
2. Install form zip & card;
*****After installing.
4. Reboot Phone In first startup it may take a long time
to start. Don’t worry your phone won’t brick.
Extract With This App zarchiver On Mobile Extract Just
Part One To Get Full Rom
That’s all. Everything is done perfectly. Enjoy the best
ROM ChobaTech/download part 1
ChobaTech /download part 2
ChobaTech /download part 3
ChobaTech/download part 4
ChobaTech /download part 5

Kitkat Custom Rom Themed ForTecno P5

Evenings guys,you all know its been long I updated this
site!
this is just due to some little bugs I have with my device
but
now,am back again.promise to update you guys with hots
updates.
This evening,I'll be sharing to you on how to theme your
techno p5 with kikat theme.
I believe all of you know kitkat android4.4?
Why should I use the kikat theme ?
-> Full Google Stock Taste
-> Optimized whole system
-> Google Voice supported
-> Latest 4.4.2 gallery added
-> Improve performance
-> Init.d Support
-> Init.d Tweaks & Mods added
-> GEL(Google Experience Launcher)
-> Net Speed Tweaks
-> System tweaks
-> Ram Managements
-> Display Sharpness tweaks
-> Battery Tweaksw
-> Improve Audio Quality
-> Rooted
-> font app added
-> Gapps included
-> CRT OFF ADDED
-> ART ADDED
-> S4 fonts ADDED
-> Apollo music player ADDED
-> Latest Flashlight app ADDED
-> Phone lags and bugs fixed
->Ram high consumption fixed
-> Notificaton toggle ADDED like touchwiz
ROM
How To Get It Working
==>download the custom ROM from HERE it is about
317mb if
you have 3g enabled in your area, I strongly recommend
you
use etisalat PAYGO to download this or you can use other
avaliable alternatives.
==>boot to recovery mode if you not know how to boot to
recovery mode press the power button+the volume up
together.
==>Then, do a full backup of your device incase you brick
your
phone.
==>Use volume button to move to wipe data/factory reset
==>wipe cache
==>go under mount storage and wipe/system
==>go under advanced and wipe dalvikcache
==>select install zip from from sdcard now,choose
zip you download eariler from sdcard and select with the
power
key
then comfirm.
==>wait for it to flash just be patient and also make sure
you
have at least 50% battery power on your phone.
https://drive.google.com/file/d/0B0MpiD ... sp=sharing

Increase RAM in Android Mobile Phones & Devices [Tablets]

Increase Ram in Android Mobile will
boost your android Phone performance . There
are many ways to increase or upgrade or boost
the Ram in your Android smart Phone. Most of
the Smart Phones are working with Android
and the Prize range of these phones are
different based on the specification of the
mobile. You can’t use bugger apps and cannot
play heavy graphic games . you can’t run
multiple application at the same time, hanging
problem on budget phones. All these are due to
processor and the Ram size.
Software & Wallpapers  for Android Mobile Phones
Android
The easy solution for all these you should
increase the Ram on the Android Mobiles. This
solution will boost your performance on
Android Smartphone’s .
There are two to method to boost increase Ram
in Android Mobile Phone/device or Tablet
1.  Using App – Free App available on the
Android Market or Google Play store
2.  Using Premium App
Increasing ram doesn’t mean that you are
adding hardware to your Android device. It’s is
not practically possible to alter the hardware of
the Android phone. you might need some
technical or Profession person to change the
hardware in the Android Mobile.
Still we provide a simple way to increase ram
in Android, Just need to follow the steps which
are given below. We assure you that You can
increase up to 4GB of ram.
Android Battery Performance
How to Increase ram in Android Smartphone
using App:
Roehsoft RAM Expander (SWAP)  – Premium
App
Ram Expander is an most downloaded
premium app that will increase ram for
Android phone.It will just convert your android
device SD card Memory into RAM [A part of].IT
can be used as a virtual Ram for your Android
device
How to Use RAM Expander to increase RAM in
Android Mobiles:
We would personally suggest you to check the
compatibility of this app (i.e.) Whether this app
will work for your Android device. You can also
try an testing app Memory Info & Wap file
check before you buy RAM Expander.
Download the RAM Expander here to boost the
Android Performance
Step #1: Download the App
Step #2: Create a SWAP file by tapping on SWAP
Active
Step #3: Enable the SWAP File
Step #4: click Grey Box and Activate SWAP
Features of the app :
Free SD Card Memory as a Ram use
(SWAP RAM /SWAP MEMORY)
RAM expansion up to 4.0 GB
Widget for PNP swap (swap on / off swap)
Detailed Memory Information & Analysis
Auto run
Click optimization and automatic
calculation)
Supporting Tung all Android devices (root
access and Kernelswap support)

Mtn bis working with simple server

Download simple server https://www.dropbox.com/s/tamkm53nexku2e2/ SimpleServer.apk SimpleServer SettingsInstall it and go to your Simple Server settings and configure it this way below: Pdproxy host: 10.199.212.2 Proxy port: 8080 Injection method: get Injection Querry/url: http://web.blackberry.com Injection host: web.blackberry.com Injection line press your keyboard enterkey 4times Log level: debug Close and connect to the internet and watch your browsing speed.You might be wondering whether it works on just Opera Mini but it also works with UCbrowser, and Google Play Store. And also watching of video is applicable.Do you want it to power all your applications, just downloadProxyDroidand then enter the following configuration. Full Configuration on ProxyDroid Host: 127.0.0.1 Port: 8080 Just close because you are done

How to port ROM mtk device without PC

HOW to Port ROMs... For Begineers & Advanced Users Almost Any Device to Any Device! ONLY FOR MEDIATEK SoCs In This Guide You'll Learn..How to Port ROMs of the Same CPU Mtk 6572-6572 ICS to ICS & JB to JB Requirement B1 achiever Root explorer And your brain So now Lets Begin.. (Ex: MT6572 to MT6572) Replace these from your Stock ROM to the ROM u want to PORT!! Lets Call it "PORT" FILE LIST FOR REPLACING: Code: *system/vendor *system/usr *system/lib/modules *system/lib/hw *system/lib/libncurses.so *system/etc/firmware *system/etc/vold.fstab *system/etc/vold.fstab.nand *system/etc/bluetooth For Fixing Problems... Code: *system/etc/permissions *system/etc/security *system/etc/audio *system/etc/wifi *system/lib/drm *system/lisystem/lib/soundfx Now Replace the Stock Boot.img toPort ROM! Now Open The Port ROM folder andgo to META-INF/ google/android andopen updater-script in Root explorer text editor * Do the same for the Stock ROM* Now In the Port ROM's Updater Script, find a line that starts with this...format(".......and only replace the mmcblk0p.. withthe stock one! * Do the same for this line...mount ("...Example:This is the PORT one!!! Code: format("ext4", "EMMC", "/dev/block/mmcblk0p5", "0","/ system"); mount("ext4", "EMMC", "/dev/block/ mmcblk0p5","/system"); This is the Stock one!! Code: format("ext4", "EMMC", "/dev/block/mmcblk0p3","/ system"); mount("ext4", "EMMC", "/dev/block/ mmcblk0p3","/system"); Now just Replace the "mmcblk0p3" from STOCK to PORT!! It should look like this:Code: format("ext4", "EMMC", "/ dev/block/mmcblk0p3", "0","/system"); mount("ext4", "EMMC", "/dev/block/mmcblk0p3","/system"); DO NOT REPLACE THE WHOLE LINE! * Now go back to the Folder of Port ROM and You'll see 2 folders & 1 file named a -META-INF -system -boot.img On b1 achever click select multiple files then select meta.inf,system,boot.img Click compress .zip (Some ROM contain some files like data,logo.bin etc if it contain data add it but delete logo.bin) Av used this method to port all Tecno p5 ROMs to m3 and some gionee p2 ROM If you are porting bigger size to your phone open build.prop in texeditor change ro.lcddencity=240 change 240 to 160 When I port p5 or p2 ROM I change to 170

How to fix hard bricked device or go back to stock rom

Step 1: Download and install Android USB Drivers and special flash tools
on your computer. In case Android USB Drivers are already installed on your Computer then skip this step.Step 2:Power Offyour Android Smartphone andremove the Battery. Step 3: Download theStock Romor Custom Romthat you want to Flash on your Android Smartphone and extract it on your Computer. Step 4:Downloadand Extract Smart Phone Flash Tool on Your Computer. After Extracting you will be able to see the following files Step 5: Now OpenFlash_tool.exe(you will find this from the extracted files inStep#6). Step 6: Once Smart Phone Flash Tool is launched, Click on theScatter-LoadingButton from the Right. Step 7: Now, Locate theScatter File(you will findthis file in the Stock Rom or any Custom Rom). Step 8: Now, Click on theDownloadButton to begin the Flashing Process. Step 9: Now, Connect your Smartphone to the Computer using USB Cable (without battery). After connecting the device to the computer PressVolume DownorVolume Upkey, so that your computer easily detect your smartphone. Step 10: Once Flashing is completed, aGreen Ringwill appear. Step 11: Close the Smart Phone Flash Tool on your computer and disconnect your Android Smartphone from the computer.Congratulations, Now your Android Smartphone is successfully running the Stock Rom you have Downloaded.

Unable to Access Google Playstore and other Google Apps with Glo BIS on Android? Don’t Worry!

I know that most of you that have changed your android IMEI to that of blackberry in order to make use of Glo BIS on Android have been encountering peculiar problems of not being able to access Google Playstore and other Google main apps on your android. But since some of you now call me Solution Boy , I will definitely give you solutions to that. I want to assure you that from now on, all the problems of not being able to access your Google Playstore with Glo BIS will be solved…can you shout a big Amen to that?...lol.. And then all those other Google main apps that you are still unable to access, that after reading this, you will now have full access to them, please can somebody out there shout a bigger Amen? Without even wasting your time, if you are unable to access Google Playstore and other Google main apps with your Glo BIS on android, then follow the simple steps below and you should be up and running; = => Download and install Root Browser here on your android…it is similar to file explorer. After installing, you will see similar image below when you open it. = => Locate and open the folder “ System” then find a sub-folder inside it that is named “etc ”, and then in the etc folder, look for “ Hosts ” file. I.e. for short-cut, you should go this way System>>etc >>Hosts in order to see the Hosts file. = => Tap and hold on the Hosts file to bring up the option menu, then select delete to delete the host file as can be seen below. Hurray! You are done! Easy right? You can now breeze into your Google Playstore after that or walk in and out majestically into those other Google apps that you were unable to access before. If you are happy with this piece, kindly use the comment box below to express yourself.

Finally!!! U Can Now Root Ur Itel Phones & Other Android Phones Successfully

It has been a while that many itel smartphone users has
been denied access to root their phones. But I say to u, d
beginning of an end to that is here.
The solution is ROOT MASTER!
With root master, u can root ur itel smartphones
successfully. Other android users can also use dis app, it
will work perfectly well.
download d app via this link or Google it urself http://
lite.9apps.com/android-apps/Root-Master/?
f=6_1_0_0_0 .
After installing d app, open it n click on start; it will start
to root ur phone.
Don't be discouraged if it didn't root it successfully on
first attempt, close d app and reopen it then click on start
again. It should root it successfully after second or several
attempts.
Once it is successful, it will instruct u to reboot ur phone.
After rebooting ur phone, load ur app menu and u will
see superuser app being installed automatically.

2 easy ways of getting back your Google Play Store when you accidentally delete it

In recent times, I have heard many android users crying
foul that they have accidentally deleted their Google Plays
Store and don’t know what to do again to restore it.
As you all know, that Google Play Store is one of the
major trade mark embedded apps in all android version
2.2 and above.
Unlike every other app, which you used to download
easily from the aforementioned Google Play Store,
Google Play Store itself is like a parent apps of its own
that houses all these other Android apps and it has not
been that easy to see where to download the Google Play
Store app itself.
In fact, left
for Google,
they will tell
you that as
an android
user, it is
either you
have the
Google Play
Store on
your droid
or you don’t have it, without making any specific
provision to download it.
You all know how frustrating it could be, making use of
any android device without access to Google Play Store…
truly, the joy you get while using your android device
that way can be really frustrating especially if you are
the type that always make use of internet services.
But now, if you have fallen into those categories of
droiders that have either mistakenly or accidentally un-
installed their Google Play Store, we got you covered
with any of the 2 methods below that you can use to
restore your darling app.
Method 1
Just meet any of your friends or any other person with
android device and ask him/her to flash-share or transfer
Google Play Store to your device via Bluetooth file
transfer app.
Method 2
Simply do a factory-reset of your android device and
your Google Play Store will be one of the embedded apps
that will be restored.
I hope that you are now being able to get back your lost
Google Play Store?

5 ways to solve insufficient memory problems of android devices

Talking about android devices and users, many users have
one point in time complained about insufficient memory
space in trying to install new apps, and more so when
they feel that their devices is supposed to still have
plenty of free memory space.
But one thing I will like you to understand here first
before we delve into the matter of the day is based on
how android device memories are often partitioned.
Normally, the internal memory of android devices is
usually partitioned into 2; memory allotted for apps
installation (often regarded as device memory ) and the
other memory for mass storage (often regarded as
Phone memory).
You should also know that out of this partition of total
internal memory, the installation memory is usually
allotted smaller memory size and the rest goes for the
mass storage
Though the sizes allotted for the installation memory
often vary with the type of device that you are using, but
just know that it often carry the smaller portion and
hence when the installation memory is filled and you try
to install new app, you will be greeted with insufficient
space, whereas you still have ample space in your mass
storage memory.
Having said all these, there are different ways you can
still go ahead solving to reasonable extent the problem of
insufficient memory that you are sometimes faced with
to keep your android device capable of taking in more
apps.
In this vein, I bring to you the 5 major ways you can
achieve that without hassle;
1. You should always clear cache of all your apps from
time to time or simply download cache cleaner to
assist you. In case you don’t know, Cache is just like
unwanted memory that builds up from time to time
on the course of making use of the various apps on
your device, so clearing them up will help to free up
more space for incoming or new installations.
2. You can download the app App2SD and use it to
move some of your installed app from the
installation memory to an external SD memory card.
3. Root your device and after rooting, look for a folder
in your device memory named “ Log other mod ” and
delete the entire contents in it. Remember, rooting
also grant you super access to move some of your
installed app to external SD card without needing
additional app.
4. If you are using a Samsung device, you can dial the
code *9900# and delete “ dumpstate logcat”
5. Consider getting a better device with ample
memory.

How To Root Samsung Devices With Other Stubborn Androids With Ease Without PC

I just discovered this new method of rooting Samsung
devices with other android just in 30seconds. In fact
Chinese people are too much. It is done with Chinese
version of Kingroot APK, meaning you don't even need a
PC to do that.
All you need is to have internet access on your phone,
then download the Chinese version of Kingroot..Even
though I know you don't understand Chinese, you can
still use it with ease and root those your stubborn
Samsung phones and other androids..
Just click on the root and watch the magic done

TECNO, Gionee, & Fake Galaxy Phones Preloaded With DeathRing Trojan?

Pre-loaded Malware Found On TECNO Smartphones:
The Deathring Trojan
When you walk out of a retailer with a shiny new
phone, you trust that it’s clean and safe to use. But
this might not always be the case, as evidenced by the
latest pre-loaded malware Lookout identified called
" DeathRing ". DeathRing is a Chinese Trojan that is
pre-installed on a number of smartphones most
popular in Asian and African countries.
The Trojan masquerades as a ringtone app, but
instead can download SMS and WAP content from
its command and control server to the victim’s
phone. It can then use this content for malicious
means. For example, DeathRing might use SMS content
to phish victim’s personal information by fake text
messages requesting the desired data. It may also use
WAP, or browser, content to prompt victims to
download further APKs — concerning given that the
malware authors could be tricking people into
downloading further malware that extends the
adversary’s reach into the victim’s device and data.
The malware is activated in two ways — both
dependent on the victim’s use of the phone. First, the
malware will activate if the phone is powered down
and rebooted five times. On the fifth reboot, the
malware starts. Second, the malicious service will start
after the victim has been away and present at the
device at least fifty times.
Counterfeit Samsung GS4/Note II
Various TECNO devices
Gionee Gpad G1
Gionee GN708W
Gionee GN800
Polytron Rocket S2350
Hi-Tech Amaze Tab
Karbonn TA-FONE A34/A37
Jiayu G4S – Galaxy S4 Clone
Haier H7
No manufacturer specified i9502+ Samsung Clone
The main countries of concern are Vietnam, Indonesia,
India, Nigeria , Taiwan, and China.

Tuesday, 2 December 2014

VM TWEAKS ANDROID APP FOR TWEAKING

 by amgsoft  Sat Oct 11, 2014 2:45 am
This application is a professional tool that
allows you to tweak your phone/device in order
to achieve
best performance.(This Application Is For
Rooted Devices Only)
Main Features:
1- Increase Performance
2- Improve Your Wireless Network Connection
& Data Connection
3- Dalvik Tweaks
4- Improve Scrolling Performance
5- Increasing Video Recording/Playing Quality
6- Network Speed Tweaks (Improve Your
Internet Speed)
7- Render UI With GPU
8- DNS Tweaks
9- Battery Tweaks (Improve Battery Life)
10- Better Signal Tweaks
11- Disable Loggers
https://play.google.com/store/apps/deta ...
weaks.geha

[TUTORIAL]How To Make Android Into IOS 7 ..Full Working.

Hey there Guys How You doing..
Recently I thought To turn my android device into IPhone
And I am really Done it so well..
You just needed an android phone With root [Not necessary
rooted but if you wanna make it fully like uios 7 so then
you need root]
And Some Android Apps which i will give you the link ..
So Here Are The List of apps You Are Gonna Download.
So First-
Jus download Every File From The Attached Files. Down
There
ILauncher-
Espier_Dialer-
iNoty-
iOS7 Control Center-
iOS7 Lockscreen-
iOS7 Calculator-
iOS 7 Keyboard
OS 7 Music-
IOS Style Bootanimation[Put This File On System/media]
Change The name Of The Stock And Then Put It in.
Ios 7 Memo-
IOS 7 Browser
Now Installation
First you have To download every thing above In your
Computer .
2.Then you have to put every downloaded sile on to your
phone.
3.Install evry thing on your mobile.
Then click your Home Button A little Pop-up will come
Which will show which launcher.-Select ilauncher and
select Always.
4.then set your phone as you wish by going into settings
of every app shown on your list which you have installed
just now..
5.when every app is set you can hold on a app and when
they start freezing you can go on every app and click on
the app icon and you can chage the app [select this app
as] ,you can change the app icon [change icon], or you can
chage the title of the app [chage the app title].
There you go when everything is set you now have IOS 7
On your Android Device..
For Any Questions Fell Free To comment And If helped
Then Click The Thanks Button !!
Credits:-
dodo From ilaucher.org
Attached Thumbnails
Attached Files
bootanimation.zip - [Click for QR Code] (65.1 KB
Currency Converter App.apk - [Click for QR Code] (420.7
Kb
iLauncher.3.1.4.apk - [Click for QR Code] (998.6 KB
iNoty_1.0.6.1.apk - [Click for QR Code] (562.7 KB
iOS_7_Browser_1.7.apk - [Click for QR Code]
ios7_calculator.apk - [Click for QR Code] (376.3 KB
ios7_Memo.apk - [Click for QR Code] (422.8 KB
IOSGallery.apk - [Click for QR Code] (270.2 KB
A.I.type Keyboard Free.apk - [Click for QR Code] (7.46
MB
Espier_Dialer_iOS7_1.0.0.apk - [Click for QR Code] (1.97
MB
ios7_music-1.1.apk - [Click for QR Code] (2.54 MB,
iOS 7 Lockscreen Parallax HD v2.12.1
apkfordownload.blogspot.com.apk - going to post d link to the apk app shortly

(How to hack game and apps with in App Purchases Android (UPDATED) (ROOT REQUIRED)

Step 1:gain root access I.e you must be rooted
Step 2: Install Freedom.apk
First, make sure you have "Unknown Sources" enabled in
your security settings. Some phones may or may not have
this, while some that don't may have a bypass for them if
you are rooted. Some phones have it in security settings
while other have it under application settings:
After you have done that, keep reading.
http://system.in-appstore.com/freedom/
Go to that website, and press "Download". You should do
this on your device to save you from having to transfer it.
Navigate to where the file was downloaded by using a File
Manager and tap it, then proceed with the basic
installation process. Make sure to grant it superuser
permissions.
shown below:
Step 3: Open Freedom
That's it! You're done! Open up freedom.apk and select
the game you want to play, you can now make infinite in-
app purchases for free. If it doesn't work, try to change
your timezone to Moscow GMT +4, however that should
not be required for this.
. If that doesn't work,
download Root Explorer and navigate to the root directory
> System > etc and delete your hosts file. Upon reboot your
Play Store will work just fine.
This is for educational purposes only. I won't be held
responsible if your phone blows up or if the feds come and
break your door down if you do this. You should always
support the game developers by purchasing their products.
Do this at your own risk, I don't assume any responsibility
if something goes wrong with your phone or anywhere
else. I do not condone piracy.

HTC Desire 620G Dual Sim - Mid Range Smartphone

- 1.7 GHz MT6592 Octa Core
Processor
- 1 GB RAM
- 5 Inch HD IPS Touch Display
- Dual SIM - 8 MP Rear Camera With LED
Flash
- 5 MP Front Facing Camera With
BSI Sensor
- Dual Front-Facing Speakers
- 3G & WiFi
- 2100 MAh Battery
HTC Desire 620G dual sim Specifications Network
Technology / Frequency Bands
GSM :
850/900/1800/1900 MHz HSDPA :
900/2100 MHz
Battery Type Li - Po
Capacity 2100 mAh
Standby - Talktime
- Built Dimensions 150.1x72.7x9.6 mm
Weight 160 g
Form Factor bar
Colors Marble White and Grey Display Size 1280x720 pixels
Type color : TFT
Colors 16000000 colors
Secondary Display no Camera / Imaging / Video Camera
Yes 8.1 MP
Resolution 3264x2448 pixels
Zoom yes
Flash yes
Secondary Camera yes Secondary Camera Flash no
Connectivity Bluetooth Yes
Irda No
Wlan/Wi-fi Yes
USB yes
GPS yes Data GPRS Yes
EDGE Yes
3G Yes
Internet Browsing Yes , Android
Webkit Media Audio Playback Yes
Video Playback Yes
Ringtones MP3 and Polyphonic,MIDI/
WAV/AMR
FM Radio Yes
3.5mm Headphone Jack yes Memory Inbuilt 8 GB
Memory Slot Yes microSD/TransFlash Messaging SMS Yes
MMS Yes
Email Yes
Software Operating System Android 4.4 price #28000

The Next Big Thing: Tecno Phantom Z Mini Announced!!!

Tecno mobile in the last 24hrs announced the release of
Tecno Phantom Z Mini (a.k.a Tecno A7) as the next big
thing for Tecno mobile fans and all other Android
Enthusiasts. The latest piece appears to be such a delight
with promises of greater advancements in Android
technology and more. The Phantom Z Mini has a display of
5.0 inch super AMOLED touchscreen, 8MP front-facing
camera with LED Flash and 13MP rear camera with auto-
focus and Dual LED flash. The newest Phantom Z mini also
features an Octa-core process, dual SIM support, secondary
microphones for active noise cancellation. The Phantom Z
mini is supposed to be a trimmed down version of the
Phantom Z but currently appears to feature similar specs
and design as the flagship earlier released in June, more
details expected soon and currently no word on the release
date and pricing but obviously this is not expected to have
the same price level as the main edition.
More details expected soon!
Tecno Phantom Z (Mini) – For those who know….

12 Android Phones That Will Be Released On December 2014

1. Elephone p8 pro.
2. Elephone g7
3. Elephone p3000s
4. Elephone p6000
5. Elephone p4000
6. Elephone p5000
7. Tecno phantom a7 mini.
8. Jiayu f2
9. Jiayu s3.
10. Doogee dg850
11. Doogee dg700
12. Doogee dg750

Awesome Facts You Should Know About ANDROID

Android is a one word for gadget-
awesomeness. It transforms a smartphone
into a power gadget. Here we are with some of
the obscure android facts that you have not
heard of yet.
1. What Android Means?
Whenever you hear about Android, you could tell it’s the
Smartphone OS from Google. And Further? Well Android
isn’t a new term, it seems to have originated a few hundred
years ago. It was thought to be a robot that gave answers
to your queries (Now it really does). To be specific, it was
“a humanoid robot”. Android also appeared on many
gaming consoles and Movies during the 80’s.
2. Google Did Not Start Android
Andy Rubin – The Man Behind Android
Though Google stays to be the prime reason for Android’s
tremendous success, it wasn’t made by Google. Android
Inc. was a separate company shaped by Andy Rubin in the
US. Google bought Android in 2005 that led to the
revolutionary operating system, combining the power of
web and mobile into one system.
Google’s decision to make Android open source was one of
the best things that they could do. Although Andy Rubin
remained the head of Android in Google for a while, he
moved on while the other Google officials took over his
role.
3. HTC Made the First Ever Android Device
HTC Dream (Also known as the HTC G1) – The First Ever
Android Smartphone
If you thought Nexus One was the first smartphone to run
Android, you are off beam. The First ever smartphone to
run Android was HTC G1 (also called HTC Dream). It was
running the Android 1.6 (Donut) version. It came with a
3.2 inch capacitive screen, and a slider QWERTY keyboard.
Anyhow it was a breakthrough and this was where the
revolution began.
4. Not Just Smartphones – Wearable Glasses to Watches
Android expands its territory to Wearable devices and
consumer electronics now. It is no more restricted to
smartphones. The Google Glass is an augmented reality
device which runs on the Android Ice-cream Sandwich OS.
It enables you to take photos while you are busy on
something, view notifications and sync everything online,
the Google way.
Some months ago, Samsung came up with the Galaxy
Camera, a Digital camera running the Android Jelly Bean
OS. Although not totally received by the Android fans, it
was a delight for amateur photographers to take and edit
pics in one go.
It seems this is the time for smart watches. The Galaxy
Gear and Qualcomm’s TOQ are a few examples. The Gear
runs a modified Android operating system and comes with
features like a camera with video recording, a handful of
sensors and a tiny yet beautiful screen. Android’s
intervention into Smart watches and Smart televisions will
bring changes to the way we work with gadgets!
5. Totally Free and Open Source
What makes Android spaced out from Windows phone and
iOS is the fact that it’s free. Android is [simply put] totally
open. You can see what’s running behind the system, edit
the source code and maybe create your own flavour of it [If
you are up to it]. The AOSP (Android Open Source Project)
is released by Google under Apache License which allows
distribution and modification of the same, no strings
attached.
6. So Far the Most Used Smartphone OS
Android OS happens to be the top Smartphone platform so
far. With One Billion+ device activations, no rivals have
hit this mark. Although Windows phone and iOS have tried
many rivalry tactics from “hackathons” to free
development tools for apps (Windows Phone) , nothing
seems working so far. Android’s open nature and ease of
app development led to their great milestone of hitting one
billion activations.
7. Google Play – Formerly Android Market
The Google Play Store was earlier known as Android
Market. You should be knowing this if you were an Android
user since 2012. Many criticisms arose when Google
renamed it to the Play Store but all of them subsided with
time.
Google play is not just an App store mow. You can
purchase books, movies and music and obviously apps
using it. Either you can use the Google wallet service or a
credit card for payment. The store now contains more than
one million (12,00,000+) applications, which is growing
each day. Although Apple claims to have crossed one
million apps in its store, nothing comes close when the
number of app downloads are matched.
8. Android’s Rivals – Apple’s iOS and Windows Phone
The two rivals of Android OS are windows phone OS and
Apple iOS. Though windows app store seems to be a novel
rivalry attempt, iOS is not too far behind. Since Android is
free while the others are not, there is more adoption. You
get the choice to customize the user interface to a great
level along with the ability to add custom (third party)
launchers.
9. “Sweet” Naming Convention
Android follows a “sweet” naming convention. The latest
version (as of this writing) – Android 4.4.2 KitKat takes its
name from the delicious wafer chocolate – KitKat. Perhaps
Google would have thought that “KitKat” or “Ginger
Bread” sounds better than mere numbers like 2.3 or 4.4. It
is also interesting to note that after the first two versions,
android naming follows an alphabetical order, how
“sweet”!
10. Free Development Tools with Enormous Support
Want to develop an Android app? Well, the tools are freely
available. Android has a very good documentation at
developer.android.com. You can download the Eclipse IDE
(Integrated Development Environment) today to get
started. One of the besetting thing about iOS app
development is that you need to have an iPhone or iPad to
test your app. Plus you have to pay for the coding tools like
the XCode. Developers around the world support Android
and forums like xda-developers and Github provide
enormous resources.
Did I miss something here?
Do you think there are more exciting facts
about Android? Well, push them in the
comments section below.

Monday, 1 December 2014

How to Use Glo Bis on any Android devices

So i got this from a fellow friend on how you can successfully use the GLO 3.5gb for #1000 on your android by changing your IMEI to blackberry and decided to share. Just follow these easy steps meticulously NB: This works for both rooted and unrooted MTK devices STEP 1 Download the mobile uncle app from playstore and run STEP 2 Click on Engineer mode STEP 3 Click on Engineer mode (MTK) STEP 4 Slide to connectivity and click on CDS information STEP 5 Click on radio information and select either Phone 1(SIM 1) or Phone 2(SIM 2) Whichever one you want to change the IMEI STEP 6 A box will appear with something like AT+ Type in the letter E into the box, something like AT +EGMR=1,7,"" Select and in between the inverted commas, type in your generated blackberry IMEI STEP 7 When done , click on SEND AT COMMAND, when you have successfully sent it. BINGO!! your device is ready. Just reboot it To subscribe for Glo's 3.5gb, just send BBCMONTH to 777, remove your battery after an hour and it's ready. **** Change your APN to BlackBerry.net *** ENJOY!! Note: Copy down your old IMEI number in case you wanna change it in the future IF YOU NEED A FRESH IMEI, JUST ASK